

If water appears around a window during rain, do not start by running silicone along every visible edge. Caulking can help only when rain is entering through a small, accessible gap around the frame, trim, or wall joint.
If the water is coming from a cracked wall above the window, a failed glass gasket, a loose frame, or a roof or balcony leak, a new bead of sealant may look neat but still fail during the next heavy rain.
For a beginner, this is a reasonable DIY job only when the window is safely reachable and the problem is a failed perimeter seal. The first step is to confirm that.

Check Whether Caulking Is the Right Repair
Dry the area after rain, then watch where the water first appears the next time it rains. If it shows up at the joint between the window frame and the surrounding wall, the old sealant may have cracked, detached, or disappeared.
Caulking May Be Suitable If
- Water appears at a small gap between the frame and wall.
- The old sealant is cracked, loose, mouldy, or peeling.
- The frame is firm and the surrounding wall is not crumbling.
- The outside edge can be reached safely from ground level or a safe platform.
- The leak happens at the perimeter joint, not through the glass or opening sash.
Caulking Is Less Likely to Solve the Problem If
- Paint bubbles or water stains appear above the window.
- Water comes through the glass edge, sliding track, or opening sash.
- The frame is loose, corroded, bent, or separating at the corners.
- There are cracks in the exterior wall or render around the window.
- The window is on an upper floor or condo facade that cannot be reached safely.
- Water appears even when it has not rained, which may point to condensation or another moisture source.
For Malaysian homes, this distinction matters because heavy rain, wind-driven rain, humidity, and sun-exposed walls can expose a weak seal quickly. A small frame-to-wall gap may be a caulking job. A leaking facade, failed waterproofing, or damaged frame is not.
Do Not Seal the Inside and Ignore the Outside
An interior bead can tidy the edge between the frame and wall. It may also reduce small drafts or cover a cosmetic gap. It usually will not stop rain if water is entering from outside.
If the leak path is on the exterior perimeter, the repair normally needs to happen there. Sealing only the inside can hide the leak while water continues entering the wall or frame area.
If you cannot see or safely reach the exterior joint, get the window or facade checked instead of sealing the inside and hoping the stain disappears.

Choose Sealant by Exposure and Surface
For a rain-exposed window, look for an exterior-rated window or frame sealant. The label should say it is suitable for outdoor use and compatible with the surfaces you are sealing, such as aluminium, glass, uPVC, timber, painted masonry, plaster, render, concrete, or metal.
Common hardware-shop and marketplace search terms include:
- window frame sealant
- exterior sealant
- weatherproof sealant
- neutral silicone sealant
- PU sealant
- hybrid sealant
- acrylic gap sealant
- backer rod
- silicone gun or caulking gun
Do not choose only by the word “silicone”. Different sealants have different uses, paintability, curing behaviour, and surface compatibility.
Which Sealant Type Makes Sense?
For many exterior window joints, a suitable exterior-rated silicone, PU, or hybrid sealant may work. The right choice depends on the frame material, wall material, weather exposure, movement, and whether the bead must be painted.
Use this as a buying guide, then check the exact product label.
| Situation | More suitable option | What to check |
|---|---|---|
| Exterior frame-to-wall gap exposed to rain | Exterior window/frame sealant, neutral-cure silicone, PU, or hybrid sealant | Outdoor use, UV/weather resistance, frame and wall compatibility |
| Aluminium, glass, or uPVC frame joint | Neutral-cure silicone may be suitable | Compatibility with the frame material and exterior use |
| Painted trim or visible edge that must be painted | Paintable exterior-rated acrylic, PU, or hybrid sealant | Paintability and rain exposure limits |
| Sheltered interior trim gap | Paintable acrylic gap sealant | Interior/exterior rating and paint-over time |
| Large or deep gap | Sealant with backer rod, repair to the wall edge, or professional repair | Joint size, backing, frame movement, wall condition |
Bathroom silicone is not automatically the right choice for a window. Some silicone products are meant for wet areas such as basins, tiles, showers, and countertops. A window exposed to sun and rain needs a product that suits outdoor weather and the actual surfaces around the frame.
If the wall or trim needs repainting after the repair, check paintability before buying. Many silicone sealants are not intended to be painted over, although specialist products vary. If paint must go over the bead, the product label needs to say it is paintable.

Tools and Materials
For a simple ground-floor window, you usually need only basic tools. The sealant choice and surface preparation matter more than buying a large kit.
- Exterior-rated window/frame sealant that matches the surfaces and exposure
- Caulking gun for cartridge sealant
- Utility knife or sealant remover
- Plastic scraper for delicate frames
- Cloth, brush, or vacuum for dust
- Suitable cleaner for the frame surface
- Masking tape, if you want cleaner edges
- Gloves and eye protection
- Backer rod, only for wider joints where the product instructions support it
Avoid metal scrapers on surfaces that scratch easily, such as some aluminium, uPVC, painted frames, and glass edges. If you use alcohol or another cleaner, test that it will not damage the finish and let the surface dry before sealing.
Wait for a Dry Weather Window
Malaysia’s humidity and rainfall make timing important. Choose a dry spell, not the hour before an afternoon storm.
The joint should be dry and firm before sealing unless the product specifically says it can be used on damp surfaces. After applying the sealant, follow the manufacturer’s cure time before exposing it to rain. Cure time can depend on the product, bead size, temperature, and humidity.
If the wall is still damp from the last rain, wait. Sealing over trapped moisture can make the bead peel or allow the stain to return.
Remove Failed Old Sealant
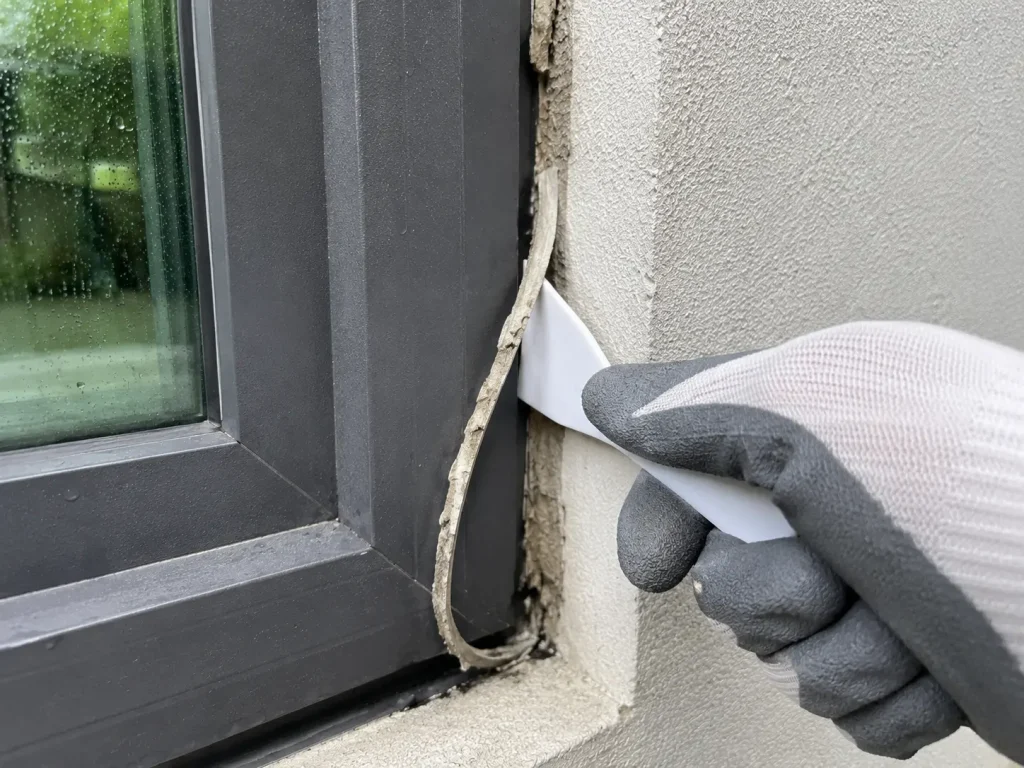
If the old bead is cracked, loose, dirty, mouldy, or peeling, remove it instead of caulking over it.
Cut along the old bead carefully with a utility knife, then pull or scrape it away. Work slowly near glass and frame finishes. The aim is to expose a clean, sound joint where the new sealant can bond.
Do not gouge the frame or wall. If the wall edge crumbles, the frame moves, or the gap becomes much larger than expected, stop and reassess. The frame or wall edge may need repair before caulking.
Clean and Dry the Joint
Sealant needs a clean, dry, sound surface to bond well.
Brush or vacuum away dust and loose debris. Remove dirt, oil, algae, mould, peeling paint, and old sealant residue as far as practical. Use a cleaner that is suitable for the frame and wall material, then let the joint dry.
If the surrounding paint is peeling, scrape back the loose paint first. A bead stuck to weak paint can detach even if the sealant itself is suitable.
Leave Drainage Slots Open
Some aluminium and uPVC window systems have small drainage slots or holes, often near the bottom of the frame. These may be designed to let water escape.
Do not seal every hole just because it looks like a gap. If an opening appears to be a drainage slot or weep hole, leave it clear. Blocking a designed drainage path can make water collect inside the frame or push water somewhere else.
If you are not sure whether an opening is a defect or a drain, do not seal it until the window type has been checked.

Apply One Continuous Bead
Cut the cartridge nozzle at an angle. Start with a small opening; you can cut it larger if needed. Load the cartridge into the caulking gun and test the flow on scrap material or newspaper.
Hold the nozzle against the joint and apply steady pressure. Move along the gap in one continuous pass where possible. The bead should touch both sides of the joint, not sit loosely on the surface.
For a very narrow crack, there may not be enough space for the sealant to bond properly. For a very wide or deep gap, do not try to fill the whole void with sealant alone. A backing material such as backer rod may be needed, or the frame or wall edge may need repair first.

Smooth the Bead So Water Can Run Off
Tooling means smoothing and shaping the bead after application. Use a sealant finishing tool, a suitable plastic tool, or a gloved finger if the product instructions allow it.
The bead should be smooth, continuous, and pressed into the joint. Avoid air gaps, breaks, pinholes, or high ridges where water can sit. On an exterior window, the shape should help water run off rather than collect against the frame.
If you used masking tape, remove it before the sealant skins over, following the product instructions. Waiting too long can tear the edge.
Let the Sealant Cure Before Testing
Do not spray-test the window immediately after sealing. Let the sealant cure according to the product label.
After curing, check the bead visually. Look for gaps, missed corners, lifted edges, or areas where the sealant did not bond. The next rain is usually the real test, but avoid forcing water into the frame with a strong jet. That can create a leak path that normal rain would not.
Common Mistakes That Cause Leaks to Come Back
The most common failure is poor preparation. Sealant cannot bond properly to wet dust, mould, oil, peeling paint, or loose old caulk.
Other mistakes include:
- Sealing the inside only when water is entering from outside.
- Using a product that is not rated for outdoor weather.
- Buying bathroom silicone without checking frame and wall compatibility.
- Choosing non-paintable silicone for an area that needs repainting.
- Blocking drainage slots or weep holes.
- Applying sealant before the wall or frame has dried.
- Making the bead too thin to bridge the joint.
- Filling a large void with sealant instead of using proper backing or repair.
- Working on an upper-floor window without safe access.
If the leak returns after a careful caulking job, treat it as a sign that water may be coming from another source or that the joint is moving beyond what the sealant can handle.
When to Call a Contractor
Call a suitable tradesperson instead of treating the job as simple caulking if the window is not safely reachable, especially on upper floors, condo facades, light wells, or roof-adjacent areas.
You should also get help if you see:
- Cracked glass or a failed glazing gasket
- Loose, bent, corroded, or damaged frames
- Cracked exterior render or wall cracks around the opening
- Water stains above the window
- Ceiling leaks near the window
- Balcony, roof, or facade leaks
- Concrete spalling, exposed reinforcement, or crumbling masonry
- Repeated leakage after previous sealing
For condos and apartments, the exterior facade or window area may involve building management, common property, or contractor access. Do not lean out of a window or attempt facade work just to apply a bead of sealant.
Frequently Asked Questions
Can I use silicone to seal a leaking window?
You may be able to use silicone if it is exterior-rated and compatible with your frame and wall surfaces. For many window jobs, neutral-cure silicone, PU, or hybrid sealant may be suitable. Check the label rather than buying any cartridge marked only as “silicone”.
Should I caulk inside or outside the window?
If rain is entering from outside, the outside leak path usually needs to be repaired. Interior caulk may tidy the edge, but it may not stop rain from entering the wall or frame area.
Can I caulk over old silicone?
If the old sealant is loose, cracked, dirty, mouldy, or peeling, remove it first. New sealant bonds better to clean, sound surfaces than to failed old caulk.
Why is my window still leaking after caulking?
The leak may be coming from another source, such as a wall crack, damaged frame, failed glass gasket, roof or balcony leak, blocked drainage, or poor exterior waterproofing. It may also mean the surface was wet or dirty when sealed, or the wrong product was used.
Should I seal the small holes at the bottom of my window frame?
Not until you know what they are. Some small holes or slots are designed drainage paths. If they are weep holes or drainage slots, leave them open.
Practical Next Step
Before buying sealant, find the first point where water appears. If it is a small, safe-to-reach frame-to-wall gap, remove the failed old sealant, clean and dry the joint, and use an exterior-rated product that matches your frame and wall material.
If the stain starts above the window, the frame is damaged, or the window is on an unsafe exterior face, do not try to solve it with indoor caulk. Get the leak path checked before more rain pushes water deeper into the wall.